Drawer Box and Enclosure Plans
The word "drawer" followed past dados and dovetails is surly enough to scare off many a DIYer. Still, there's an easier fashion to build a drawer without using a table saw or router, yet results in a beautiful, sturdy assembly just the same. Worried about visible fasteners? Our design cleverly hides them out of sight for a truly professional await. Follow along to meet how yous can quickly build any size drawer using this simple method.
Related Tutorials: How to Install Drawer Slides &Build a Midcentury Nightstand
Price: $vi
Time: i ½ hours
Difficulty: Easy. Square cuts and pocket hole joinery make this a comfortable beginner project.
(1) ane x three x half-dozen Board to brand the drawer front, back and sides
(1) ane 10 half dozen Board to brand the drawer front
(2) 3/eight ten three/8 x three′ Foursquare Dowel to make cleats
(1) ¼ inch Plywood to brand the drawer base
(8) 1¼ inch Wood Screws to join the sides
(2) 1 inch Forest Screws to attach the drawer face
¾ inch Finish Nails to attach the cleats
Wood Glue
Wood Filler
Annotation: This cut listing is sized to fit our Midcentury Nightstand
i x three Sides – two @ 16 inches (ane″ less than depth of cabinet box)
1 ten 3 Front end – i @ 18 inches (2½" less than width of cabinet opening)
ane ten three Back – 1 @ eighteen inches (2½" less than width of chiffonier opening)
3/8 x 3/8 Cleats – two @ 18 inches (2½" less than width of cabinet opening)
3/8 ten 3/viii Cleats – 2 @ 13¾ inches (2¼" less than length 1×3 Sides)
¼ inch Plywood – i @ xviii″ x xiv½" (Length of ane×three Forepart – by – 1½" less than length of Sides)
1 x six Drawer Face – ane @ 20¼ inches (¼" less than width of opening)
Steps
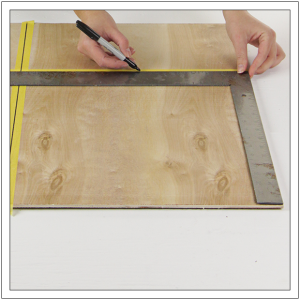
1. Cut the Parts
Using a miter saw and the cut list above, cutting the 1×6, ane×3, and foursquare dowels to size. Marker cutting lines on the confront of the plywood using a framing foursquare. Identify painter's tape over the cut lines, and and so mark them over again if necessary. The painter'southward tape will keep the plywood from splintering during the cut. Cut along the lines using a circular saw. Lightly sand the cut edges of all the parts to remove burrs.
TIP: Bank check out our DIY Cutting Fence Tutorial for straighter cuts without a table saw.
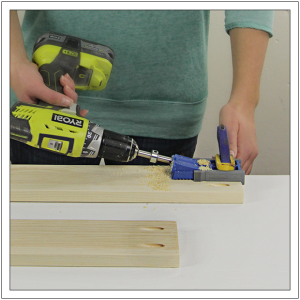
 two. Drill the Pocket Holes
Place the i×three front and back pieces on the work surface. Using a Kreg Jig, drill two pocket holes in each terminate of both boards.
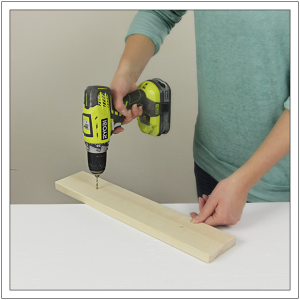
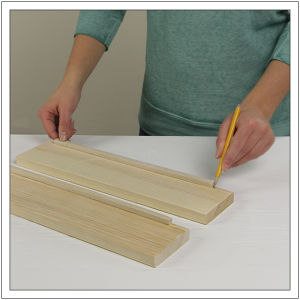
3. Drill the Drawer Face Holes
Place the 1×vi drawer confront on the work surface with the pocket holes facing down. Using a record measure and a pencil, make two marks four inches from the ends of the board, and centered on its width. Using a Drill/Commuter, create 2 pilot holes. These airplane pilot holes volition afterwards be used to attach the drawer face up.
4. Add Cleats to the Forepart and Back Pieces
Position an 18-inch cleat on the 1×3 forepart and dorsum pieces flush with their lesser edges and ends. Employ a bead of wood glue to the cleat, reposition it, and then nail it in place using a pneumatic nail gun and ¾-inch finish nails.
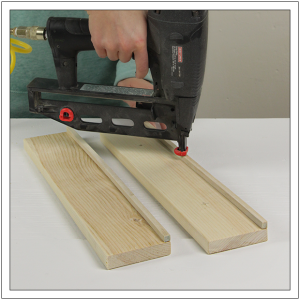
5. Adhere Cleats to the ane×three Side Pieces
Position the remaining cleats on the xvi-inch-long sides affluent with their bottom edges and centered on their lengths. This should create a 1 one/8-inch inset on each terminate of each cleat. Mark the ends of the cleats with a pencil. Remove the cleats, apply a bead of wood mucilage, and so put them dorsum in place. Secure the cleats using a pneumatic nail gun and ¾-inch finish nails.
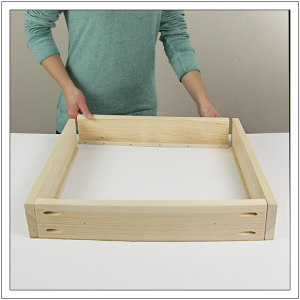
6. Dryfit the Sides
Fix the 1×3 pieces upright then that the cleats run forth their bottom edge. Employ gum to the ends of the front and dorsum pieces and then position them between the sides, flush with their ends.
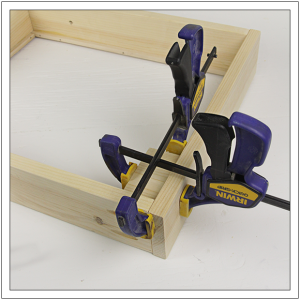
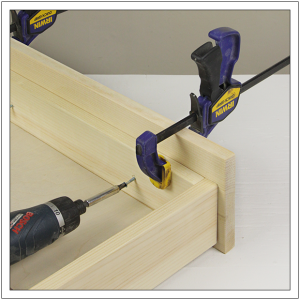
seven. Get together the Sides
In the proper name of not using fancy tools, I've used a very bones method for holding the joints foursquare during assembly. Simply place a block (brand sure it has a truly square corner) into the corner and clamp it tightly to each side. This volition aid concord the pieces in place while inserting and driving 1¼-inch pocket screws through the pocket holes and into the bordering side. Once all four corners are assembled, cheque (and recheck) that the assembly is square by using a speed or framing square and measuring corner to corner.
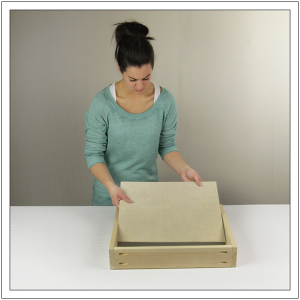
8. Insert the Plywood Base
Apply a dewdrop of forest glue to the top edge of each cleat. Position the plywood inside the frame on the cleats.
Tip: One time the drawer is painted or stained, I like to run a small bead of clear caulk along the edges of the plywood base to keep dust from falling between the plywood and the 1x3s. Additionally, if the drawer will hold heavy objects, consider using ½ inch plywood instead.
ix. Attach the Drawer Confront
Center the front of the drawer on the 1×half-dozen face. Depending on your application, let the drawer face to hang below the drawer box. Mark the placement of the drawer on the i×6, and then remove the drawer. Apply woods glue inside the marked surface area, and and so reposition the drawer. Using a drill/driver, drive 1 inch forest screws through the pilot holes in the drawer front end and into the backside of the ane×6 drawer face.
Tip: For a perfect fit, it's best to fully install the drawer box, and then position and attach the face.
Tip: Bank check out our How to Install Drawer Slides tutorial.
More than BUILDING PLANS
billsonlearallings.blogspot.com
Source: https://build-basic.com/build-a-basic-diy-drawer/